Kubernetes is a powerful infrastructure tool that can be used to run distributed applications. It has a rich ecosystem of pre-built applications and tools. In this guide I’ll walk through the process of setting up a kubernetes cluster using k3s on raspberry-pi (or other arm based devices like Orange Pi, etc).
Brief Kubernetes Overview
Kubernetes is a container orchestration tool. It allows you to run and manage containers across a cluster of machines. It has a number of features that make it a great choice for running distributed applications. There are a few key concepts to understand when building your own kubernetes cluster.
- Nodes: These are the machines that run your applications. They can be physical or virtual machines. They can be grouped into roles: master or worker. The master nodes are responsible for managing the cluster, while the worker nodes are responsible for running the applications.
- Pods: These are the smallest deployable units in kubernetes. They are a group of one or more containers that share storage and network resources. They are the basic building blocks of kubernetes applications.
- Namespaces: These are a way to partition your cluster. They can be used to group applications and resources together.
- Services: These are a way to expose your applications to the network. They can be used to load balance traffic across a set of pods.
- Volumes: These are a way to store data in kubernetes. They can be used to store data that needs to persist across pod restarts.
We’ll dive deeper into these concepts as we build our cluster and deploy applications.
Prerequisites
As for hardware requirements, At least 2 mini computers (like raspberry-pi) with a 64-bit ARM CPU and at least 2GB of RAM. These will need to run Ubuntu 20.04 or later. I’ll be using 2 raspberry-pi 4’s and 1 orange pi 5B 16GB. I’ll be using the orange pi with an SSD for volumes for stateful applications. This is optional, but will offer better performance and reliability than the SD cards usually used with these devices. In addition to the devices themselves, you’ll need SD cards, power supplies, a network switch, and ethernet cables.
We’ll be using a number of software tools to setup the cluster:
- k3s is the flavor of kubernetes we’ll be using. It’s a lightweight kubernetes distribution that is optimized for arm devices.
- Raspberry Pi Imager to flash the OS to the SD card.
- Balena Etcher to flash the OS for the Orange Pi.
- kubectl to interact with the kubernetes cluster.
Raspberry Pi - Flashing the OS
First, we’ll need to flash the OS to the SD cards. The Raspberry Pi Imager is a great tool for this. As you go through the wizard it will download the OS image for you. You’ll select ‘Other general-purpose OS’ -> Ubuntu -> Ubuntu Server 22.04.3 LTS (64-bit). Make sure you SD card is inserted into your computer and select it from the list. Then click ‘Next’.
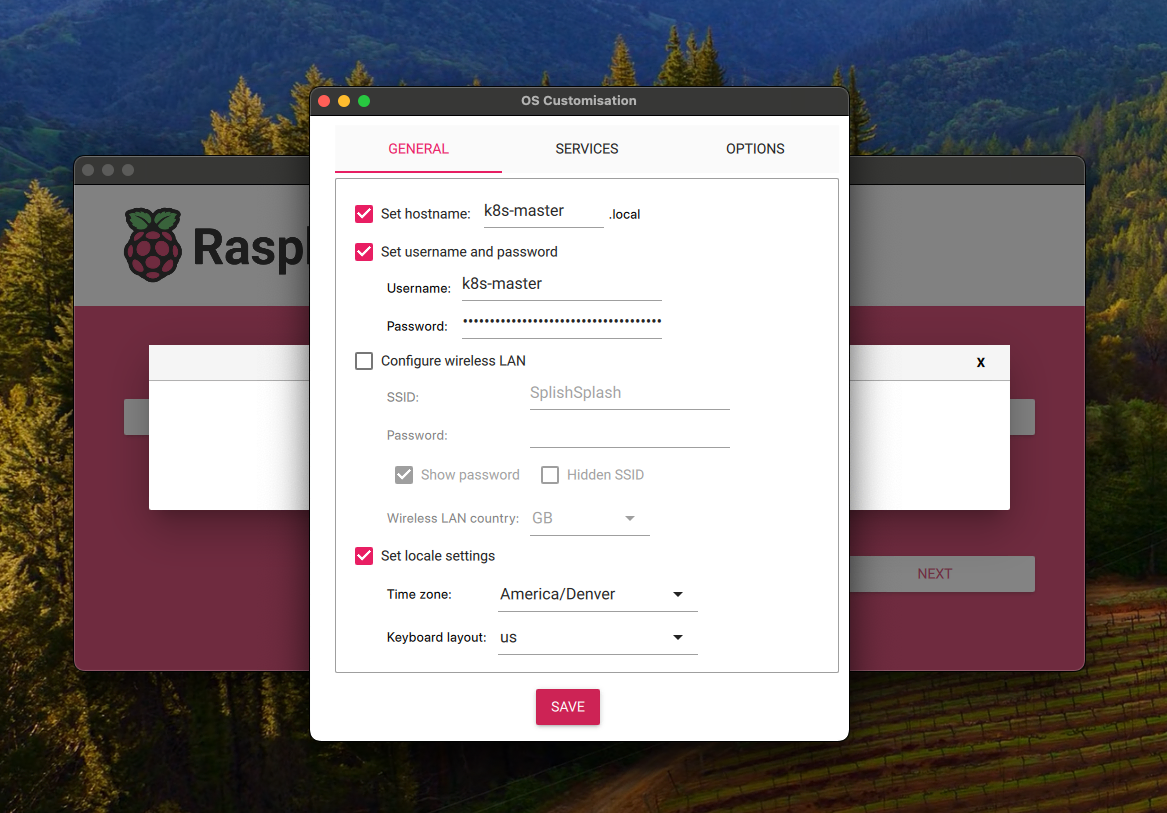
Before the Imager will flash the OS to the SD card, it will ask you to edit the config. This is where you can setup the hostname, username, password, wifi, and ssh. Follow whatever convention makes sense for you, but heres an example:

I’ll be following the hostname convention k8s-master, k8s-worker-01, k8s-worker-02. I’ll also be creating a new user k8s-master and k8s-worker-01 and k8s-worker-02 with unique passwords.
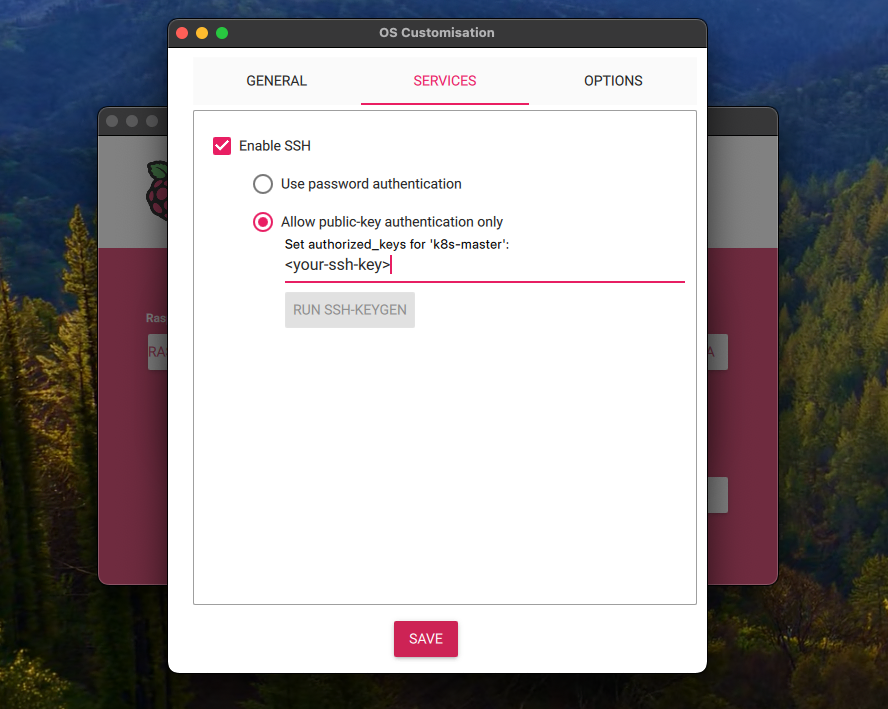
In the Services section, you’ll want to enable ssh and select the “Allow public-key authentication only” option. This will allow you to ssh into the device without needing to enter a password. This is a good security practice.

It should pre-populate the public key from your computer. If not, you can find it in ~/.ssh/id_rsa.pub. If you don’t have a key, you can generate one with ssh-keygen.
Orange Pi 5B - Flashing the OS
The Orange Pi 5B is a bit different. It uses a different image format than the raspberry-pi. We’ll need to use Balena Etcher to flash the OS to the SD card. I’ve found the official orange pi image repository is a bit difficult to access, and the images are often out of date. Thankfully, our friend Joshua Riek has invested some time into creating a repository of up-to-date ubuntu images for various rockchip boards. We’ll use the 64-bit Ubuntu 22.04 server image from his latest release.
You’ll use Balena Etcher to flash the image to the SD card. You can download the image from the repo, or provide the download link to Balena Etcher and it will download it during the flashing process. Unfortunately, this process is a bit more manual than the Raspberry Pi Imager. We’ll manually set up the hostname, username, password, and ssh after the OS is flashed. We’ll walk through that in the next section.
Configuring the Orange Pi
Connect to the orange pi to your network and plug it in. You’ll need to find the ip address for the device on your network. You can do this by logging into your router’s admin panel and looking for the device, or by using a network scanning tool like nmap.
nmap -sn 192.168.3.0/24
This will perform a ping scan on the network and return the ip addresses of the devices that are online. You’ll need to do a bit of detective work to figure out which ip address is the orange pi, but it will likely be named ubuntu. Once you have the ip address, you can ssh into the device.
ssh ubuntu@<ip address>Provide the password ubuntu when prompted. You’ll be prompted to change it on first login. If you are not prompted for some reason, you should definitely change it as soon as possible. You can do this with the passwd command.
Hostname and User
Setting the hostname will be useful for identifying the device on the network. I’ll also be enabling Multicast DNS (mDNS) so I can connect to using k8s-worker-02.local as the host. Additionally, I’ll add a new user that follows the conventions we setup for the other devices in our cluster.
# set the new hostname
sudo hostnamectl set-hostname k8s-worker-02

# enable mDNS
sudo apt install avahi-daemon -y

# add a new user
sudo adduser k8s-worker-02 # follow the prompts
sudo usermod -aG sudo k8s-worker-02 # add the user to the sudo group

# reboot
sudo reboot

# login as the new user
ssh k8s-worker-02@k8s-worker-02.local # or the IP address
Configuring SSH Access
Ssh is already enabled, we just need to add our public key to the ~/.ssh/authorized_keys file and restrict access to only allow public key authentication. We do this because when allowing password authentication, access to the device can be brute forced. By only allowing public key authentication, it makes it much more difficult for an attacker to gain access to the device.
# from your local machine
ssh-copy-id k8s-worker-02@k8s-worker-02

# or manually
cat ~/.ssh/id_rsa.pub | ssh k8s-worker-02@k8s-worker-02 "mkdir -p ~/.ssh && cat >> ~/.ssh/authorized_keys"

# restrict access to only allow public key authentication
echo "PasswordAuthentication no" | sudo tee -a /etc/ssh/sshd_config
echo "PubkeyAuthentication yes" | sudo tee -a /etc/ssh/sshd_config

# you can inspect the file to verify the changes
sudo nano /etc/ssh/sshd_config

# restart the ssh service
sudo systemctl restart ssh

# or reboot the system
sudo reboot
Setting up the Devices
There are a few things we need to do to prep each system for kubernetes.
# apply updates
sudo apt update && sudo apt upgrade -y

# for raspberry pi only, install the extra modules
sudo apt install linux-modules-extra-raspi -y

# for raspberry pi only, disable host firewall
sudo ufw disable
Installing k3s on the Master Node
First we’ll install k3s on the master node. Before we get started, its important to have the master node setup with a static IP address. This will make it easier for the worker nodes to join the cluster. There are 2 ways to do this: you can set it up in your router’s admin panel, or you can set it up on the device itself. I’ll show you how to do it on the device, but I recommend setting it up in your router’s admin panel. This will make it easier to manage and avoid conflicts with other devices on your network.
sudo nano /etc/netplan/50-cloud-init.yamlChange the file to look like the yaml below, making sure to change the addresses and gateway4 to match your network.
network:
  version: 2
  renderer: networkd
  ethernets:
    eth0:
      dhcp4: no
      addresses: [192.168.3.10/24]
      gateway4: 192.168.3.1
Once changed, apply the changes by either rebooting the device or running the following command:
sudo netplan applyOnce the master node has a static IP address, we can install k3s.
# install k3s
# this will create the cluster and generate the join token
curl -sfL https://get.k3s.io | sh -

# get the join token
sudo cat /var/lib/rancher/k3s/server/node-token

# create a kubeconfig file
mkdir ~/.kube 2> /dev/null
sudo k3s kubectl config view --raw > ~/.kube/config
chmod 600 ~/.kube/config
Joining the Worker Nodes to the Cluster
Now we’ll join the worker nodes to the cluster. We’ll use the join token we got from the master node. Make sure to update the SERVER_HOST and JOIN_TOKEN environment variables with the IP address of the master node and the join token. This process can be found in more detail in the k3s documentation.
# on the worker nodes
export SERVER_HOST=<ip address of the master node>
export JOIN_TOKEN=<token from the master node>
curl -sfL https://get.k3s.io | K3S_URL=https://$SERVER_HOST:6443 K3S_TOKEN=$JOIN_TOKEN sh -
Verifying the Cluster
Now that the cluster is up and running, we can verify it’s working as expected.
# on the master node
sudo kubectl get nodes --sort-by='{.metadata.name}'
# NAME            STATUS   ROLES                  AGE   VERSION
# k8s-master      Ready    control-plane,master   85m   v1.28.6+k3s2
# k8s-worker-01   Ready    <none>                 57m   v1.28.6+k3s2
# k8s-worker-02   Ready    <none>                 58m   v1.28.6+k3s2
Copy the kubeconfig to your local machine
The kubeconfig file is used to interact with the kubernetes cluster. It contains the information needed to connect to the cluster and authenticate. We’ll copy the kubeconfig file from the master node to our local machine so we can use kubectl to interact with the cluster without having to ssh into the master node. On your local machine, run the following commands:
# backup the existing kubeconfig
mv ~/.kube/config ~/.kube/config.bak

# copy the kubeconfig from the master node to your local machine
scp k8s-master:~/.kube/config ~/.kube/config

# update the kubeconfig to use the correct server
# replace 127.0.0.1 with the hostname or IP of the master node.
# In my case, I'll use the hostname `k8s-master`
sed -i '' 's/127.0.0.1/k8s-master/g' ~/.kube/config

# verify the connection
kubectl get nodes --sort-by='{.metadata.name}'
# NAME            STATUS   ROLES                  AGE    VERSION
# k8s-master      Ready    control-plane,master   101m   v1.28.6+k3s2
# k8s-worker-01   Ready    <none>                 74m    v1.28.6+k3s2
# k8s-worker-02   Ready    <none>                 75m    v1.28.6+k3s2
Run a Test Application
Now that the cluster is up and running, we can deploy a test application to verify it’s working as expected. We’ll deploy a simple nginx web server.
kubectl create deployment nginx --image=nginx --replicas=3
kubectl expose deployment nginx --port=8080 --target-port=80 --type=LoadBalancer
kubectl get svc nginx
# NAME    TYPE           CLUSTER-IP      EXTERNAL-IP                              PORT(S)          AGE
# nginx   LoadBalancer   10.43.231.182   192.168.3.10,192.168.3.11,192.168.3.12   8080:31818/TCP   12s
Open a web browser and navigate to one of the external IP addresses http://192.168.3.12:8080

Thats a familiar sight! The nginx web server is up and running. We’ve successfully deployed an application to our kubernetes cluster and exposed it to the network. Lets clean it up for now. We’ll deploy some more interesting applications later.
kubectl delete deployment nginx
kubectl delete svc nginx
Conclusion
We’ve successfully setup a kubernetes cluster using k3s on raspberry-pi and orange-pi. We’ve also deployed a test application to verify the cluster is working as expected. This home lab can be used for a number of different projects, including running a personal website, a home automation system, or a media server. Its a great start to a way to learn more about kubernetes and distributed systems.